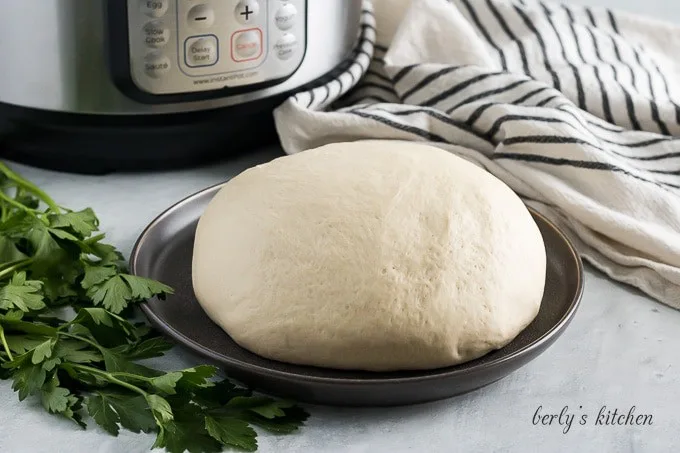
How to Proof Dough in the Instant Pot
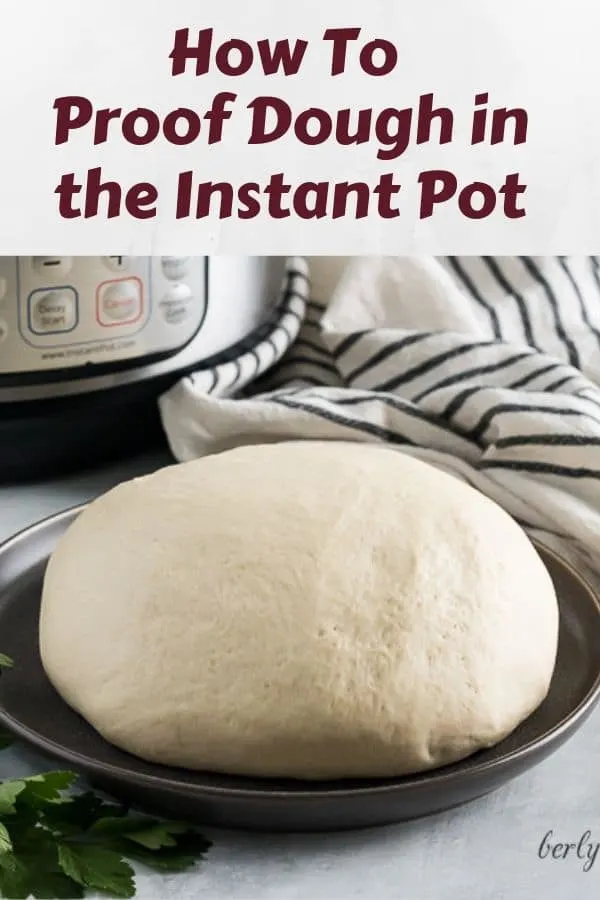
Learning how to proof dough in the Instant Pot is probably one of the best kitchen hacks that I’ve found in a long time. It provides a beautiful, soft dough that rises consistently every time!
I’ve been thinking about this post for weeks but wasn’t sure how to go about writing it. It’s not like our usual recipe posts where we talk about the recipe, give the ingredients, instructions, tips, and we’re done.
This post is different. It’s more about a process of “How-to” do something, and it doesn’t involve a specific recipe.
All this came about when I needed a loaf of bread for our homemade beef bolognese post. I meant to pick one up at the grocery store to use as a prop but forgot.
It made sense to whip up a quick French bread recipe. The only problem was the time it would take for the bread to rise.
I used this homemade French bread recipe from Mel’s Kitchen Cafe, and got to the part where the dough is supposed to rise. John and I needed to run a couple of errands, so I put the dough into the Instant Pot and crossed my fingers
After arriving home, I found a beautiful, huge amount of dough. It rose even more in the Instant Pot than it ever would have on the counter. Since then, I’ve been using the Instant Pot to proof bread dough.
There are two ways that I’ve used the Instant Pot to proof dough. One is with the yogurt function and the other is using the keep warm function.
The yogurt function is my preferred method, but it’s not available on all Instant Pot models. The keep warm function serves a workable backup.
How to Proof Dough in the Instant Pot Using the Yogurt Function:
Start by using a dough that needs to rise in a bowl or vessel for its first rise. This method is not ideal for dough that needs to be shaped before rising.
Make the dough according to the recipe. Instead of placing the dough in a bowl, covering it, and letting it double in size for 1 – 1 1/2 hours in a warm area, it’s going to go into the Instant Pot.
Equipment You’ll Need:
- Instant Pot with the yogurt function similar to Instant Pot Duo Plus 6 or 8 Quart
- Glass lid or plate
- Dough
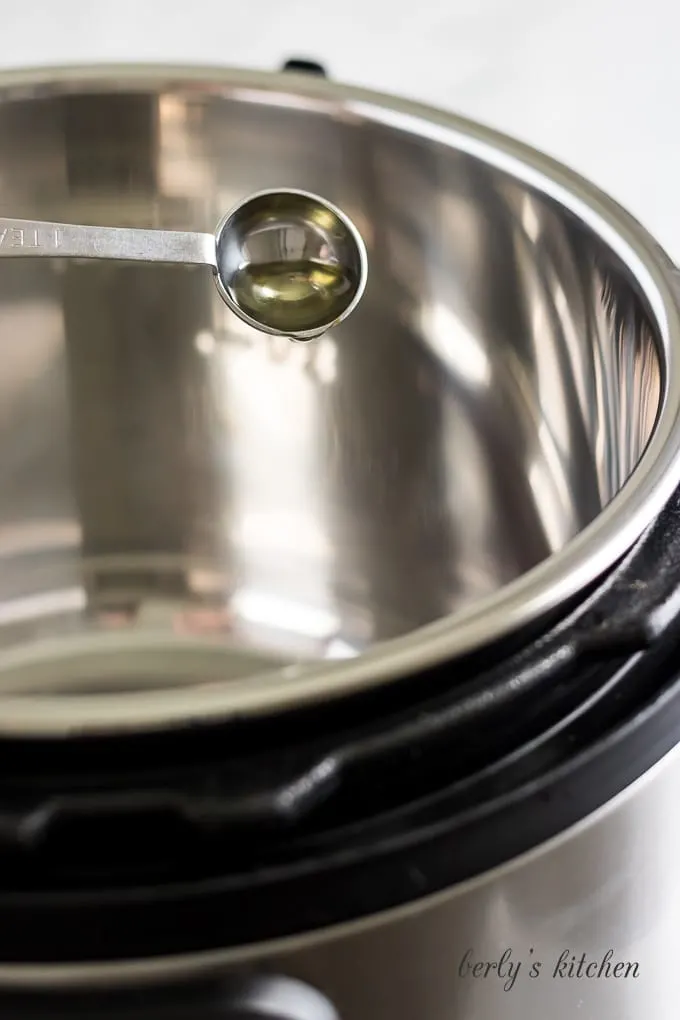
Prepare the Liner:
Pour 1 teaspoon of olive oil into the liner of the Instant Pot. The olive oil is used to coat the dough and prevent it from drying out and sticking to the liner.
Adjust the amount of olive oil as needed if 1 teaspoon doesn’t completely coat the dough.
Coat the Dough:
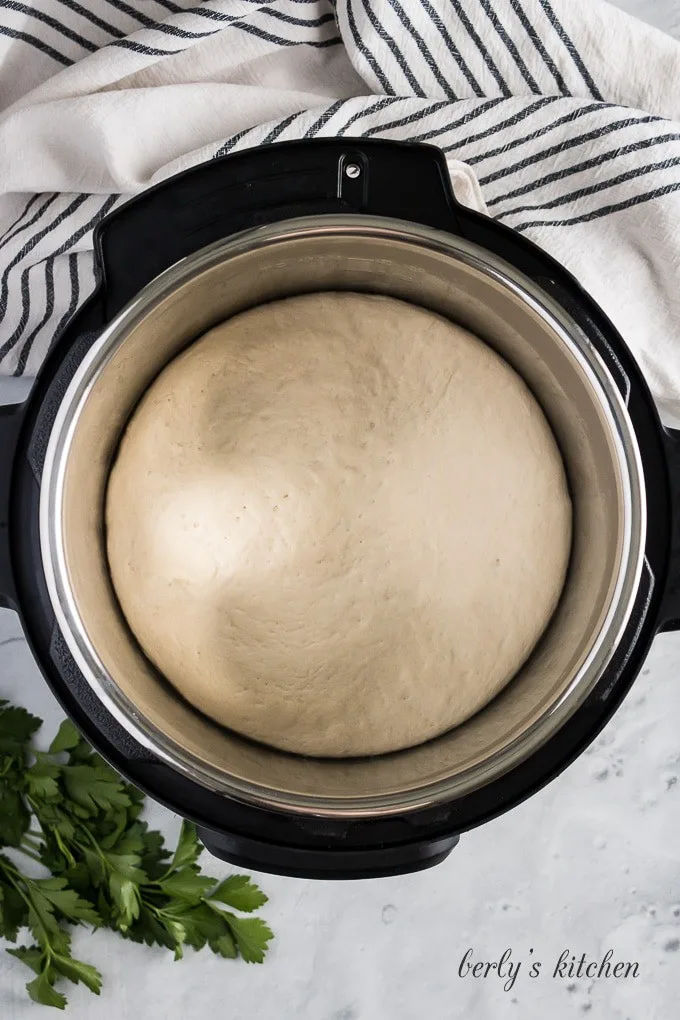
Place the dough into the Instant Pot and roll in the olive oil to evenly coat.
*If you don’t want to use olive oil, place the dough onto a large piece of parchment paper, and drop it directly onto the liner of the Instant Pot.
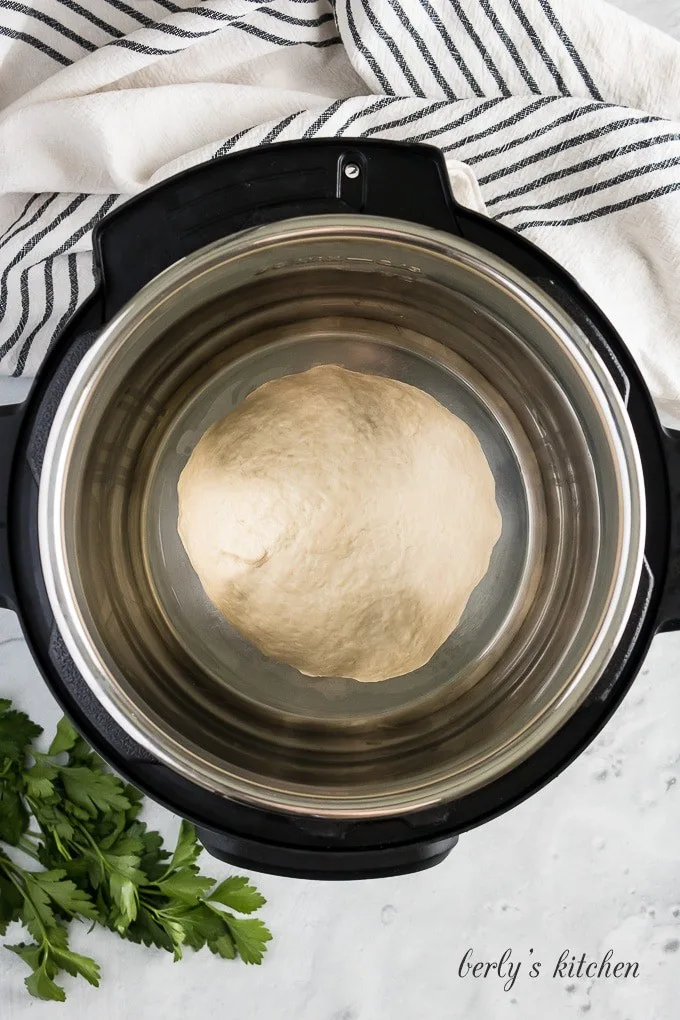
Add the lid:
Set the ball of dough in the center of the liner, and cover the Instant Pot with a glass lid or plate that fits snuggly around the edges.
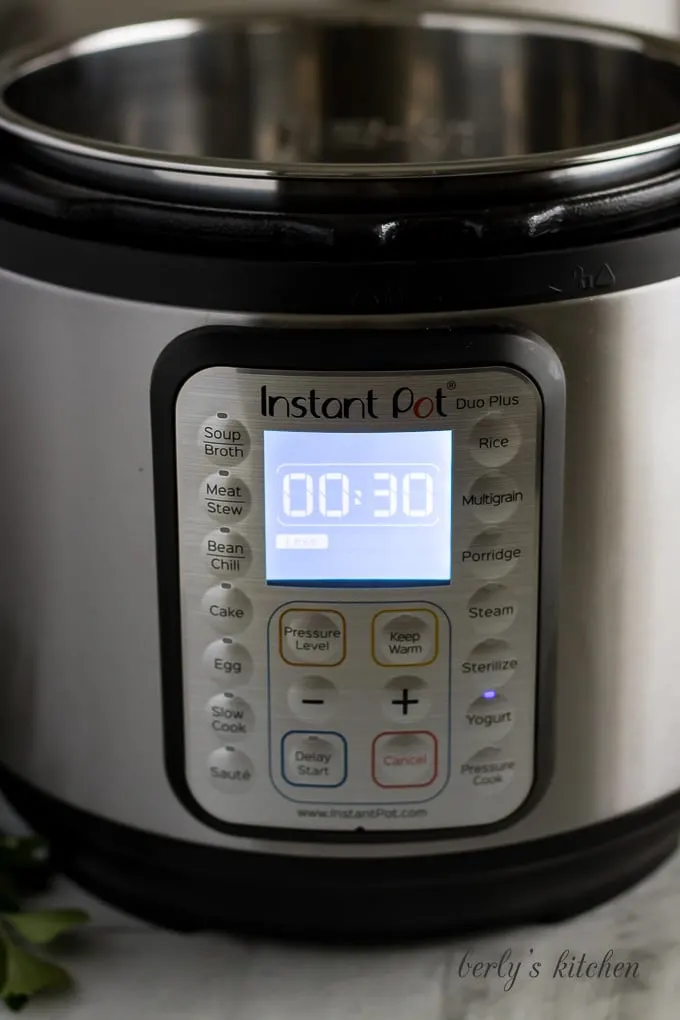
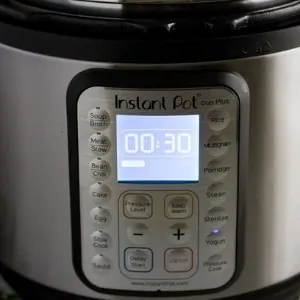
Set the Timer:
Press the yogurt button on the right side of the Instant Pot, and ensure that screen says “Less.” That means that less heat is being used to heat the liner.
In this case, less is best. Next, use the + and – buttons to adjust the time to 30 minutes. The amount of time is not set in stone and can vary depending on the dough.
I don’t watch the dough like a hawk and chose 30 minutes as an estimate (half the time a normal recipe says). It’s always worked perfectly, so I’ve never changed it.
That being said, some dough may take less time to rise and others may take more. Thirty minutes is a good starting point.
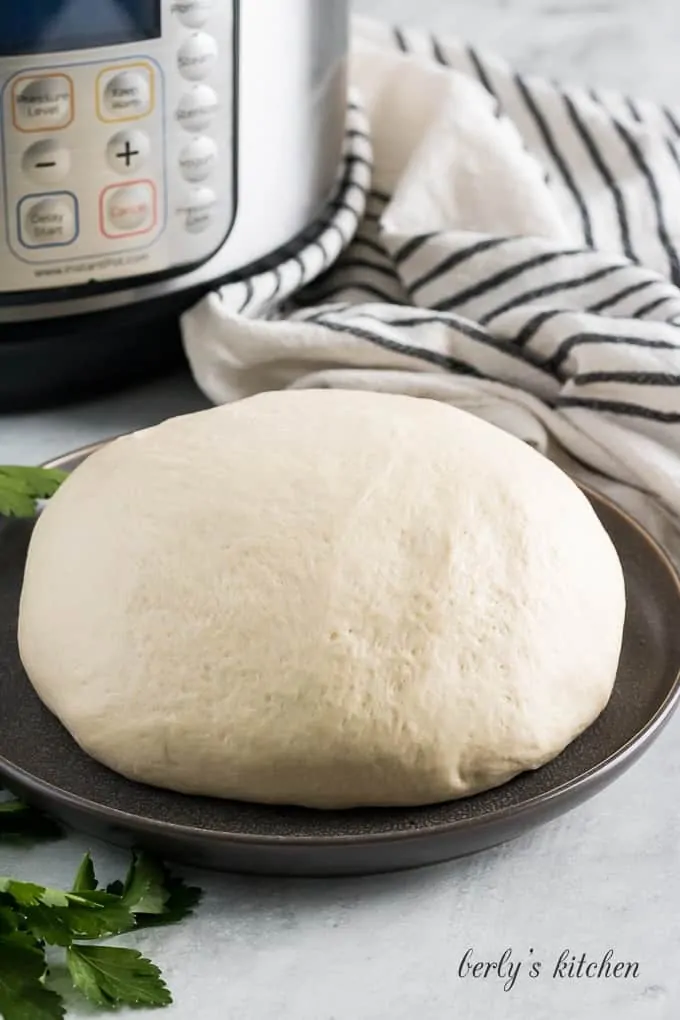
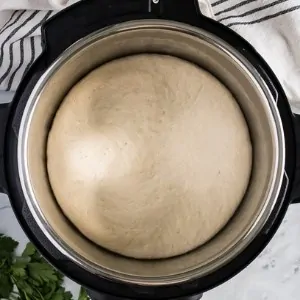
Remove the Dough:
After the time is up, check to see if the dough has risen to the recipe specifications. If so, remove it from the liner. If not, set the time for a few more minutes.
I stay pretty busy taking photos, shooting videos, doing dishes, etc., so I’m not tempted to take a peek at what’s happening inside the pot.
It’s important not to remove the lid from the Instant Pot while the dough is rising. Removing the lid could cause the heat to escape.
Some dough recipes require a second rise. If feasible, the Instant Pot can be used for the second rise as well.
How to Proof Dough in the Instant Pot Using the Keep Warm Function:
Equipment You’ll Need:
- Instant Pot with the yogurt function similar to Instant Pot Duo Plus 6 or 8 Quart
- Trivet with Handles
- Glass lid or plate
- Glass bowl that will fit into the Instant Pot
- Dough
Like I was saying above, many Instant Pot models do not have a yogurt function. After testing out a few different methods, the keep warm function seemed to be the next best option.
Start by placing a trivet with handles into the Instant Pot. Place the dough into a glass bowl, lightly roll in olive oil, and set the bowl on the trivet.
Cover the Instant Pot with a glass lid or plate. Press the keep warm button until the screen shows “less.” Mine automatically defaults to “more” which is too hot for the dough.
Next, use the + and – buttons to adjust the time to 30 minutes. After the time is up, check to see if the dough has risen to recipe specifications. If so, remove from the Instant Pot. If not, adjust the time for a few more minutes.
Drawbacks to Using the Keep Warm Function:
The keep warm function is great in a pinch. However, in my opinion, it’s a tad too warm for dough.
The first time I tried it, the dough was placed directly on the liner and the temperature was set to “more.”
Unfortunately, the dough began to cook and dry out.
The second time, I used the bowl and trivet method listed above. It worked well, but I was only able to use half the amount of dough since the bowl was small.
I didn’t want to run the risk of the dough expanding over the bowl. Additionally, the bottom of the bowl and the dough felt overly warm from the heat of the liner.
If you have the ability to use the yogurt function, that would be my recommendation.
Have Questions About How to Activate Yeast?
We have a How To Activate Yeast post that helps troubleshoot issues with proofing yeast.
Recipes to Try:
We haven’t had great success with proofing sourdough bread in the Instant Pot. I’m talking about real sourdough that utilizes a starter not Greek yogurt.
Here are a few recipes that work great if you’d like to try how to proof dough in the Instant Pot for the first time:
How to Proof Dough in the Instant Pot
Print Save PinI earn a commission from Amazon and Instacart from qualifying purchases.
Equipment
Ingredients
- 1 teaspoon olive oil
- 1 prepared dough ingredients already mixed
Instructions
- Place 1 teaspoon olive oil into the liner of the Instant Pot. Place prepared dough into the liner and roll it in oil ensuring even coating.1 teaspoon olive oil1 prepared dough

- Use a glass lid or plate to cover the liner. Turn on the Instant Pot using the yogurt button, and make sure the screen says "less" under the time. Use the + and – buttons to adjust the time to 30 minutes.
- After the 30 minutes is up, remove the lid. If the dough has risen to the specified size, remove it and continue with your recipe. If not add additional time.

Notes
- It has come our attention that this recipe is not compatible with newer models of the Instant Pot. Unfortunately, it seems the appliance will not turn on when using a simple glass lid. At this time, we are unaware of any workaround.
- We used a 6-Quart Instant Pot for this post and have not tried another size for comparison.
- Please see post for links to equipment needed, more in-depth information, and links to recipes.
- Please refer to the post for instructions for proofing dough using the “Keep Warm” method.
I have used this method for my sourdough bread using starter. I put in in my Instant Pot on yogurt setting for 4 hours (counter rise time is 8 hours) and it turns out beautifully.
Thank you Eve! We’re glad the proofing method works for you. Have a lovely day 🙂
I’ve tied a plate and a tight lid but it won’t detect a lid so the function I’ll not turn on. 😢
Good morning Marisa, I’m sorry to hear that. There seems to be an issue with newer models no longer allowing glass lids or plates to be used as covers. Unfortunately, that means using the Instant Pot lid that came with your appliance. We don’t recommend using that lid because the dough will rise into the lid itself, making a huge mess. I’m going to make notes in the recipe to warn users of this issue. Sorry the recipe didn’t work out. We hope you have a lovely day. 🙂
I’m using an Instant Pot Mini. I can’t seem to set the heat to ‘Less’.
Hi Sarah!
I’m sorry, but we haven’t tested this in any other model except the 6-quart. I’m not sure what setting will work in the “mini.” I’ve approved the comment in case another reader sees it and can offer some advice. 🙂
Help I tried to proof pizza dough worked worked good except the bottom part of the dough got hard like it was cooked. What did I do wrong? Thanks
Hi Sharyl!
What setting did you use? Was it the “Keep Warm” setting or the yogurt setting? The “Keep Warm” setting is too warm on my Instant Pot, so that’s why I recommend using a bowl and a trivet if you use that setting. Although, you may have to work with half batches. The dough does start to dry out on the bottom if it’s not in a bowl.
If you use the yogurt setting, make sure it’s set to “Low.” Hope this helps! Happy Holidays! 🙂
Can u cover with the lid that comes with instapot? Do u put water in the bottom
Good morning Elizabeth, we would not recommend using the lid that comes with the Instant Pot. Also, no you don’t need to add water to the bottom. Thank you.
Can this also be done when making french bread? New to all this, so trying to learn everything.
Hi Trish!
Yes, it can used to proof dough for French bread, then bake it in the oven as stated in the recipe you’re using. 🙂
If you don’t have a recipe for French bread, we’ve linked to one in the post that we use. It’s underneath the first picture and says “homemade French bread” in purple. If you click there, it will take you to another recipe website that we really like. Have a wonderful weekend!
I’ve been using my Proof function on my oven to help w/the bulk fermentation of my sourdough during these winter months when the house temps tend to be cooler. But I’m intrigued by this method as it would free up oven space & give me options. Was your experience w/sourdough that the temps were too high w/yogurt function ‘less’? Have you tried the trivet method w/ ‘yogurt/less’?
Hey Priscilla!
Those are great questions! Yes, the temps were a little too high for the sourdough on yogurt/less, but I didn’t try it with a trivet and bowl. 🙂 Have a wonderful day!
Worked perfectly fine for me. Normally the dought i use needs to 12-14h and with the instant pot it was 5h instead! Thanks a lot!
Thank you Genevieve! We’re glad to hear it worked well for you. Thank again for coming back to comment on and rate the recipe card. Have a lovely day 🙂
Have you tried proofing sourdough? And, how long did it take?
Good Afternoon Heather, that’s a good question. Unfortunately, we have not proofed sourdough in our Instant Pot. Sorry we couldn’t be more helpful. Have a lovely day 🙂
I seem to have trouble using the yoghurt function. It won’t start unless I use the instapot lid. It keep beeping and the letters lid keep blinking. What am.i doing wrong?
Good Morning Nadine, that seems to be an issue with certain models of the Instant Pot. So, you’re not doing anything wrong. Some models will allow users to place a glass lid the pot, while newer models will not allow for a glass lid. Unfortunately, we don’t know of a safe way to proof bread using the Instant Pot lid (instead the glass lid). Sorry, we couldn’t be more helpful.
Did you make the full recipe for French bread from Mel’s kitchen? Did you make two loaves or one large round one? Thanks, looking forward to trying this proofing of the dough. I tried another recipe using the IP but the rise time was 3 hours. I like this idea better since it would be much better for last minute.
Good Morning Claudia, that’s a good question. I spoke with Kim and she said that she used the full recipe from Mel’s Kitchen to make two loaves of the bread. Thank you for asking and have a lovely day 🙂
Hi. I have a new instant pot duo sv with the yoghurt function but when I try and proof bed it gives me a constant lid warning if I try not to use the lid.
I understand it can cause damage if u use the lid ad the dough may overrise.
Thanks for any help in advance
Rob
Good Morning Rob,
That’s a great question. Kim did some research both in Instant Pot’s website and the user manual for your model. Unfortunately, the information she found seems a bit conflicting. So, after talking, our best advice is for you to contact Instant Pot’s customer service. Mainly, because we’re not certain as to why your model is behaving that way. Sorry, we couldn’t be more helpful. However, the last thing we want to do is give incorrect information. Hopefully, their customer service can get to the root of the issue. Thank you for dropping by, Rob!
Have a great day 🙂
I just got the same Instant Pot Duo SV model and tried to proof my dough by using the yogurt setting and had the same issue. It won’t work unless I have the instant pot lid on. 🙁 I also don’t have the option to lower the temp.
According to my Duo Series User Manual, the “less” mode of the Yogurt program is actually intended for fermenting Jiu Niang. It doesn’t specifiy whether or not it maintains a lower temperature. Have you measured it?
Good Morning Randy, that’s a good question. Honestly, no we haven’t measured the temperature. However, what I can say (using hands-on experience) is that the IP has maintained a warm enough temperature to prepare yogurt (we’ve made yogurt for personal use) and proof dough (using the instructions in our post). So, while I can’t confirm the exact temperatures, I can confirm the function(s) work as intended. Thanks again for your question. Have a great day, Randy 🙂
So glad to see some guidelines for proofing yeast doughs in the IP!! Been baking my own breads, rolls, and other yeasty concoctions for years. Using the IP for rising doughs led me to buy my third IP, an 8 qt with yogurt function…YAY! Now I can use my doubled recipes! Your recommendations work like a charm – thank-you!!!
Thank you, Barbara! Kim and I are thrilled to hear that. Baking your own breads, pastries, etc. is something we find very rewarding and tasty lol! Thank you for commenting on the post and have a lovely day 🙂
Hello, this sounds like a good idea. But to make sure I understand, I will not be using the secure lid that comes with the Instant Pot, but instead use a glass lid (say from another pot I have) that fits the top. Will the top blow off and is this safe? Can you please elaborate, I am nervous I have understood incorrectly and will be doing something unsafe in my home.
Good Morning, I understand your hesitation, it’s an unorthodox method. So, let me explain and we’ll see if it eases your concerns. Yes, you would be using a glass lid (from another pot). The pressure cooker will be warming the dough, not cooking it. Meaning, that you’re using the, “yogurt,” setting and not manual or high pressure cook. The machine doesn’t need to pressurize, so the glass lid is perfect for proofing the dough. However, I would NOT recommend using a glass lid for any recipe that requires cooking. Let me be clear about that; otherwise, it would be dangerous. The only reason we didn’t use the Instant Pot lid is because Kim did not want to end up digging raw dough out of the crevices of the lid. It’s easier to use a glass lid for cleaning purposes. Hopefully, the way I explained it makes sense and puts your mind at ease. If not, I’ll see if Kim can follow up and explain in more detail. Thank you for asking and we wish you a lovely day 🙂
Sounds like a great idea! Could you cover the IP tightly with foil if you don’t have a plate that fits?
Good Morning, Linda. Kim said you should be able to cover the IP with aluminum foil. However, she also said it might be a good idea to spray the foil with non-stick cooking spray so the dough doesn’t stick. Have a lovely day 🙂