How to Activate Yeast for Baking
Learning How to Activate Yeast is an important step in baking. Having lively, healthy yeast ensures soft, puffy, fully risen dough each time.

Baking hasn’t always been one of my strengths. A little over a decade ago, the thought of baking anything from scratch was scary and seemed impossible.
Neither of my grandmothers baked using yeast, so I didn’t have any clue how to get started. I wanted to learn to make homemade bread, cinnamon rolls, and pizza dough, but I’d long heard that proofing yeast was difficult.
Eventually, I gave up and bought a bread maker. It was one of those models that did everything for you, from mixing the ingredients, to the rising, then the baking. It was great, except the bread had a really hard crust that was ridiculously hard to cut.
After a while of using the bread maker and fighting to cut through the crust, I decided it was time to learn how to proof yeast and bake homemade bread. I’ve been baking from scratch ever since, and that bread maker is long gone!
It was over 10 years ago when I went on the search for a French bread recipe and found a blog, much like ours, that showed step-by-step photos. Those photos included how to activate yeast, and since they were so helpful, I decided to include step-by-step pictures in this post, too.
Equipment Needed for Proofing Yeast:
You may not need every single piece of this equipment, but this is what I have handy when I’m activating yeast.
- Measuring Cup: I like a glass measuring cup that holds a cup of liquid. It doesn’t need to be larger unless I’m activating a large batch of yeast.
- Spoon or Whisk: For mixing the yeast and sugar.
- Measuring Spoons: For measuring the yeast and sugar.
- Water: Tap water is fine as long as it doesn’t contain a lot of chemicals and heavy metals. Most tap water is warm enough to activate yeast without having to be microwaved.
- Yeast: Instant or active yeast that hasn’t expired and looks healthy (not clumped and discolored).
- Sugar or Honey: Either one will work, and you only need about a teaspoon to feed the yeast.
How to Activate Yeast:
Choose the recipe that you’d like to use that requires yeast. Most of the time, the yeast needs to be activated.
Even if it doesn’t, this is a good way to make sure the yeast is alive and will help ensure the dough will rise properly.

The recipe should specify the amount of water needed to activate the yeast. Place the water into a measuring cup.
It should be warm water (just above lukewarm), about 110-115°F. Think about the temperature of warm milk or a warm baby’s bottle. If the water is too hot, it will kill the yeast.
Check the expiration date of the yeast. The yeast may not activate if it’s way past its expiration date.
Next, add the required amount of yeast to the warm water. Feed the yeast!
I like to add a little sugar or honey to the water and yeast mixture, then give it a stir. This isn’t absolutely necessary, but it seems to give the activation process a bit of a boost.
I don’t recommend using salt. It seems to kill off the growth process.
Be patient. Initially, I like to stir the yeast, just to make sure everything is well mixed, but after that, leave it alone.
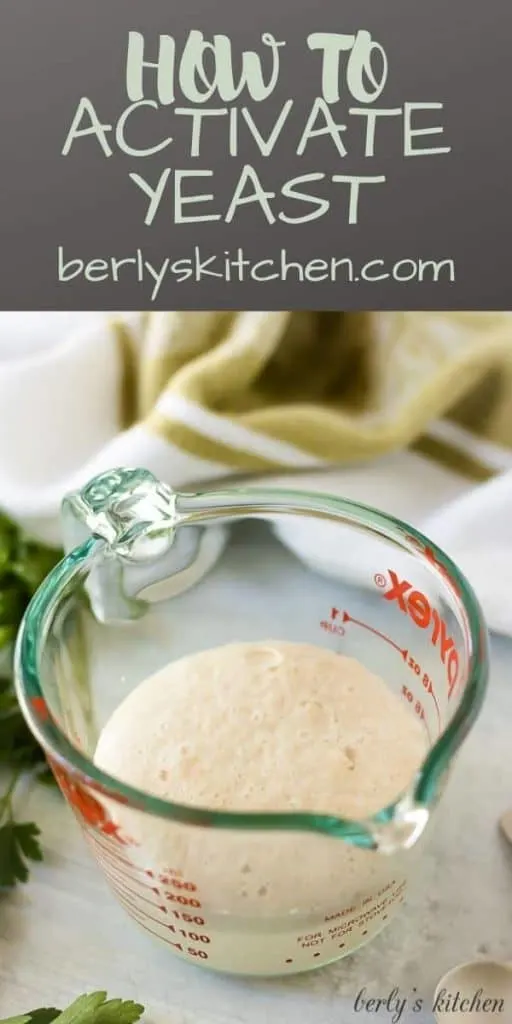
A healthy activated yeast will start to pop to the top and bubble. After about 10 minutes, the top of the water should be foamy, frothy, and smell slightly of wheat or beer.

How much yeast is in a packet?
A small, foil packet of yeast equals 2 1/4 teaspoons. It normally takes 1/4 cup of warm water to activate that amount and yields approximately 1/2 cup of fully active yeast.
Does active yeast have to be activated?
That’s debatable. This post from King Arthur Flour shows some pretty convincing evidence that it does not.
Additionally, the cinnamon rolls recipe that I linked to above calls for instant or active yeast to be dumped directly into the other ingredients without being activated (unless you want to).
The dough rises well either way. I would say, activate the yeast if you are worried about the dough not rising. Otherwise, don’t.
Does yeast need to be refrigerated?
An unopened jar of yeast should be stored in a cool, dark place, like a cabinet or refrigerator. After the jar has been opened, transfer it to the refrigerator and use it within four months.
Yeast can also be frozen and used within six months. This is why it’s important to periodically activate yeast prior to starting a baking recipe to ensure the yeast is still alive.
Need some Baking Recipe Ideas?
These recipes all use yeast, so you’ll be able to practice your new “how to activate yeast” skills.
- English Muffin Bread
- Brioche Rolls
- Garlic Knots
- Sticky Bun Braided Bread
- Jalapeno Cheddar Braided Bread
Like This Recipe?
We’d love it if you would leave a 5 Star ⭐️⭐️⭐️⭐️⭐️ rating below.

How to Activate Yeast for Baking
Print Save PinI earn a commission from Amazon and Instacart from qualifying purchases.
Equipment
- Small Bowl
Ingredients
- Water warmed to 110° to 115°F
- Yeast
- Granulated Sugar
Instructions
- Choose a recipe you’d like to make that requires activating yeast. The recipe should specify the amount of water needed to activate yeast. (Usually, this is approximately 1/4 cup). Place the appropriate amount of water into the measuring cup and heat in the microwave for a 10-15 seconds if needed. The water should be warmer than lukewarm but not hot. Aim for 110-115 degrees (think warm milk or a warm baby’s bottle).Water

- Next, check the expiration date on the yeast to ensure it isn't expired. Add the specified amount of yeast to the water. Add 1 teaspoon of sugar to the water and yeast. Stir the mixture to combine.YeastGranulated Sugar
- Let the mixture sit, undisturbed, for about 10 minutes. The mixture should begin to look tan, foamy, and frothy on the top. If you started with 1/4 cup of water, the end result should be close to 1/2 of liquid including the foam.
- After the yeast activates, follow the recipe as written.


Thank you for all this valuable information very useful. Today I’m following proofing bread in the instant pot with the ” keep warm button.” I planned on using the yogurt function than I’m looking at my 8quart IPUX pot without that function..disappointing so I did place my glass lid on top of it and placed my oval bowl on top of a trivet so it didn’t get to hot on the bottom from what I have read in comments. My question here is I see that there is moisture building up on the bottom/inside of the lid which is normal but won’t that drip onto my bread dough?? I haven’t read anything about this issue or about covering the dough itself somehow and than placing the lid on it?? any comments on this would be helpful…thank you 🙂
Hi Mary!
Thanks so much for the question! If possible, try laying a large paper towel under the lid. That should keep the condensation off the bread. We hope you have a wonderful weekend! 🙂
This is a great recipe. Thank you for posting it! Many chefs assume that beginner cooks know how to activate yeast so they skip that step and people like myself become confused. Last April when I made hot cross buns, I did not know that I had to stir the yeast mixture and buns came out very dense.
Good Morning Vanessa, thank you for commenting. Everyone was a beginner at some point, so Kim and I try to make sure our recipes can be prepared by anyone; regardless of his or her experience in the kitchen. We’re glad you liked the recipe and hope it’s useful to you in the future. Thank you again for commenting and have a lovely day 🙂
I used to have a bread machine. I think bought around 1993 or 94. Used it a lot at first, then stopped. Sold it at a moving sale in 2007.
I bake bread from time to time from scratch and I keep yeast in the freezer to extend its life. It lasts a lot longer than 6 months!
Good Morning, Cheryl! The freezer is a great place to keep yeast. I think we toss ours every few months, regardless of the expiration dates. After spending so many years working in restaurants, I think Kim and I have become paranoid about product freshness, lol! For example, my recommended, “hold time,” in the fridge is rarely more than three days. That was the standard when I worked in the industry and it has carried over to my personal life. While it can be wasteful, it definitely prevents tummy aches lol! Thanks again for stopping by and have a lovely day 🙂