Cherry Hand Pies
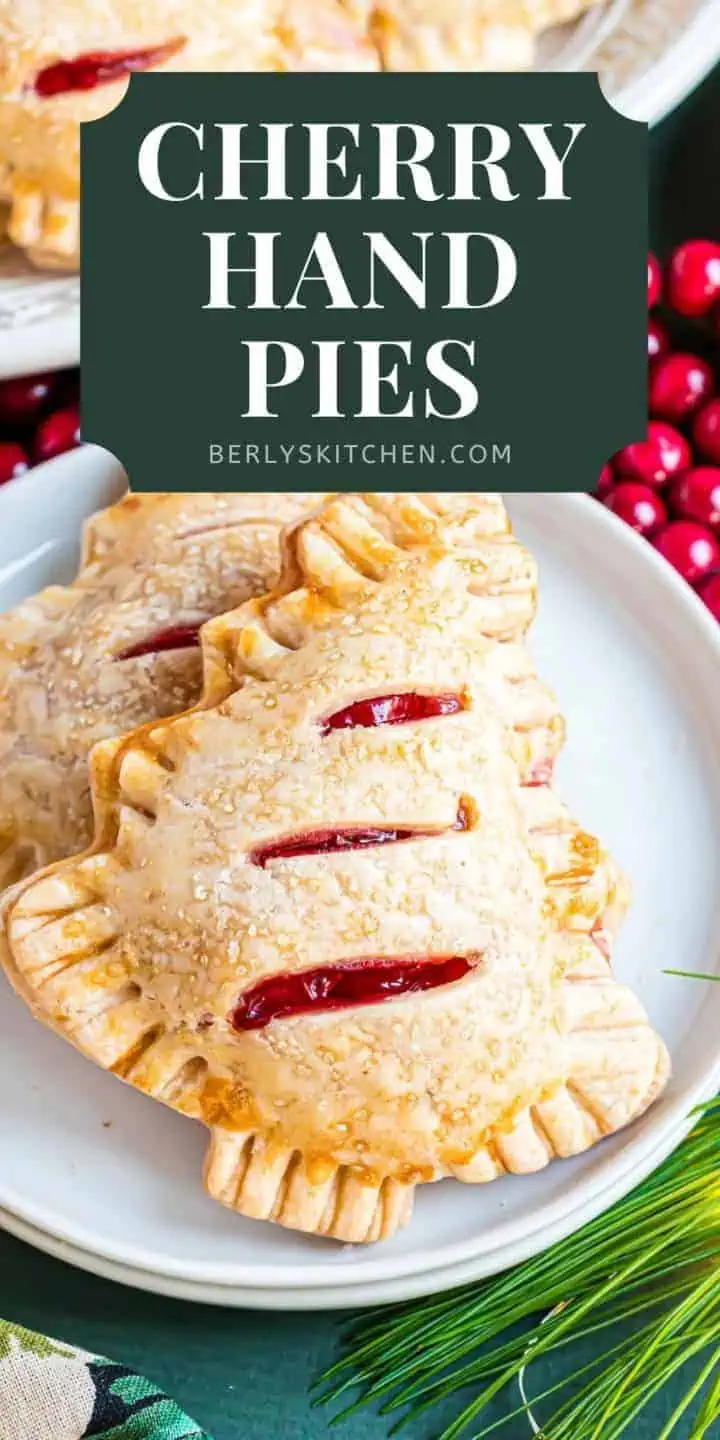
Cherry Hand Pies are the perfect treat for the busy holiday season! Easy to make and even easier to eat, these handheld pies are whipped up with ready made crusts and premade cherry filling to make your life easy without sacrificing time or taste. This recipe makes quite a bit, so it’s perfect for holiday parties, office festivities, and potlucks galore!
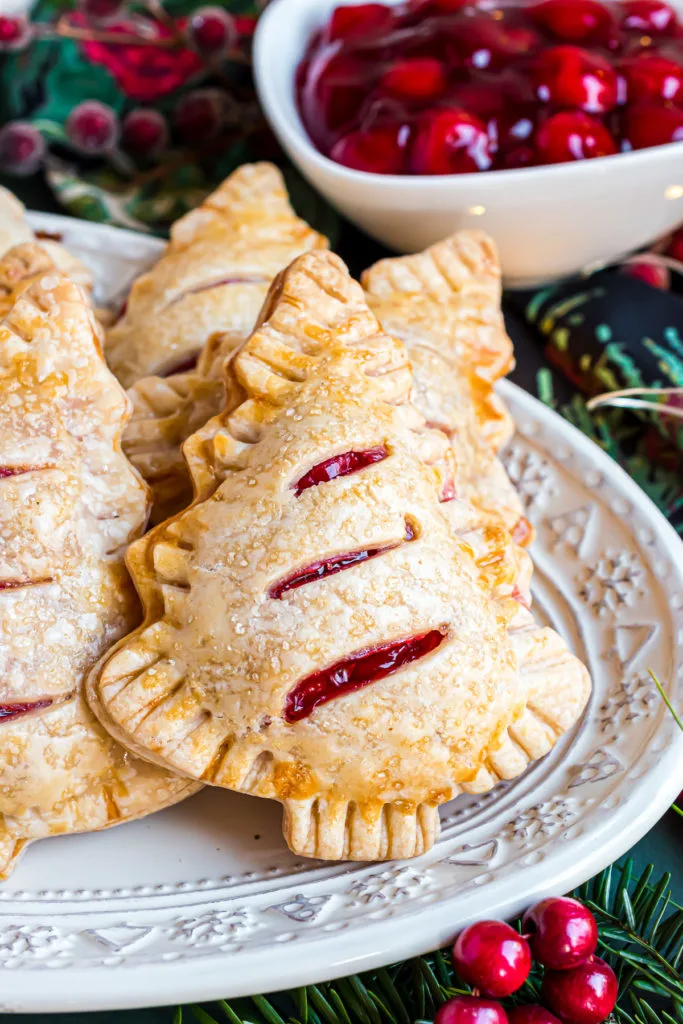
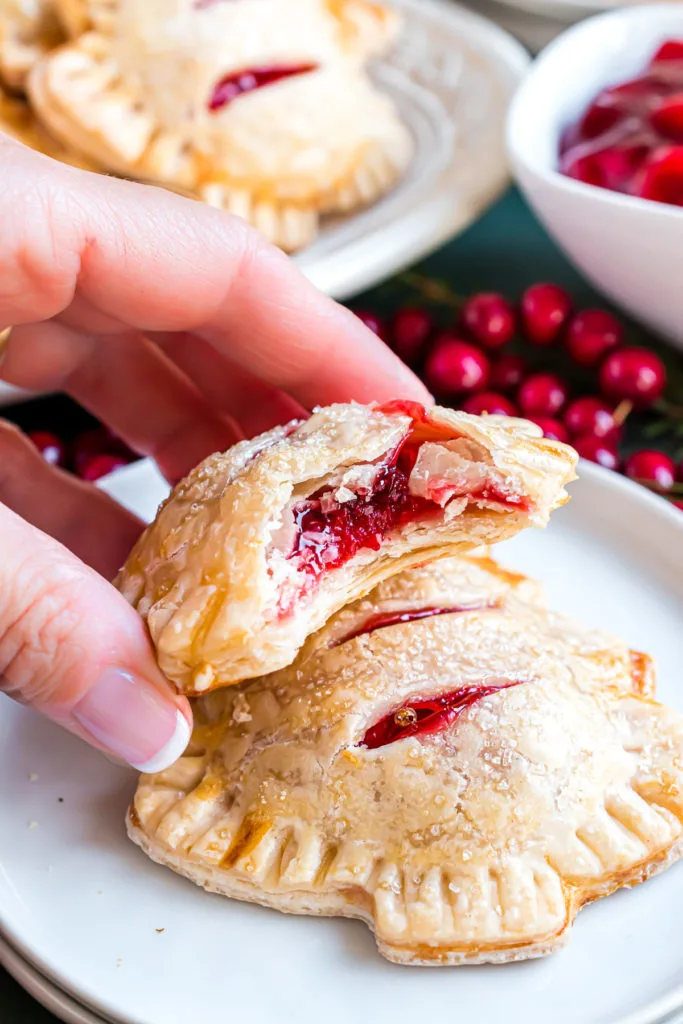
Christmas Tree Cherry Hand Pies
These Cherry Hand Pies are great for your busy holiday season. Only a few minutes of prep time and you’ll have an entire spread of sweet treats.
Serve these cherry hand pies alongside a batch of Peppermint Truffles, Saltine Cracker Candy, or Peanut Butter Balls for the ultimate holiday snack options.
This recipe is so simple, it makes for a fun opportunity to get the kids involved. They’ll love the Christmas tree shapes and assembling the pies. They might even enjoy baking them more than eating them!
Looking for hand pies that are fall themed? Try our pumpkin butter hand pies and apple butter hand pies! For another cherry filled dessert try our black forest cupcakes!
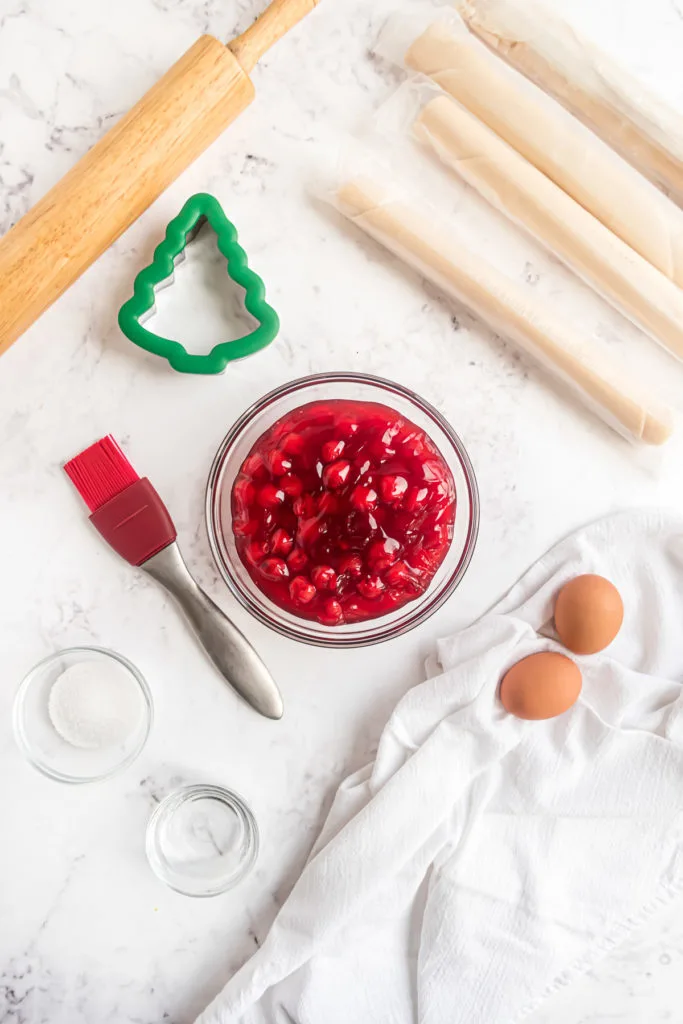
Key Ingredients
- ready-made pie crust: You’ll need 3 boxes with 2 crusts in each. If you want to decrease the amount of cherry hand pies made, you can use one or two boxes and a smaller can of pie filling.
- can of cherry pie filling: Of course you can substitute the filling for your favorite or use a variety of flavors.
- eggs: For the egg wash. The eggs will give a beautiful golden brown hue to the pie crusts.
- water: To thin out the egg wash.
- Coarse sanding sugar: This is optional but gives a pretty touch to the pies. You could also substitute red and green sugar for some festive flair.
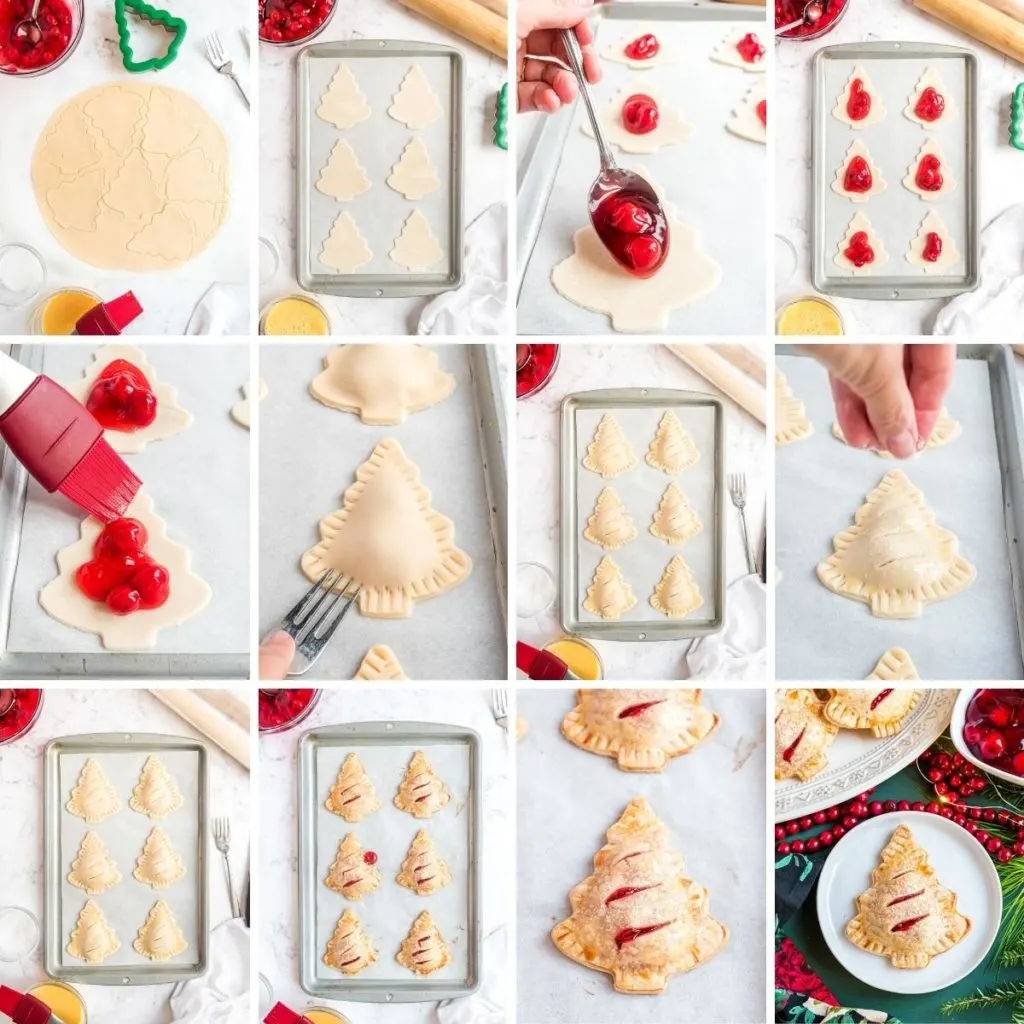
How to Make Cherry Hand Pies
- Preheat your oven to 350°F. Thaw the boxes of ready-made pie crusts according to their package directions.
- Line a large baking sheet (or several) with parchment paper and set aside.
- Whisk the eggs and water together in a small mixing bowl and set this aside as well.
- Using a rolling pin, roll out one thawed pie crust, ensuring there are no cracks or holes. Use a touch of water to smooth any cracks in the dough. The crust should be between ¼ and ⅛-inch thick when rolled out.
- Using a large holiday tree cookie cutter (or the shape of your choice), cut out 7 trees and save any excess crust.
- Place the cutout trees on the prepared baking sheet, spaced evenly apart. Now spoon about 1 – 1 ½ tablespoons of cherry pie filling into the center of each tree. Use a small pastry brush or your finger to brush the border around the filling with egg wash.
- Roll out a second pie crust and cut out 7 more trees (remember to save the excess crust). Gently place the second set of trees over the top of the filling. Starting at the trunk, lightly press the edges together with your fingers to seal the hand pies. Make sure not to press down on the filling, only the outer edges.
- Using the tines of a fork, press the seams together, working around the outline of the tree. Make a few slits in the top crust for venting. Brush the top crusts with the prepared egg wash and sprinkle with coarse sanding sugar.
- Repeat this process with the remaining pie crusts. When all the ready-made pie crust has been used, and all that remains is the excess, combine it all and roll it out. Make sure it is the same thickness as the original crusts. Complete the remaining hand pies.
- Pop in the oven and bake for 20-25 minutes or until golden brown.
- Once out of the oven, transfer to a cooling rack. Serve warm or at room temperature and enjoy!
Cherry Hand Pies Tips and Variations
- The best way to work with the ready-made pie crusts is to let them sit at room temperature for about 10 minutes. This will make them easier to roll out and cause less tearing in the dough.
- We chose cherry filling because of its red coloring. It looks festive peeking out of the slits in the hand pies. And who doesn’t love classic cherry hand pies! But feel free to use whatever filling you’d like.
- The egg wash we use is a full egg. Some only use the egg whites or the yolks, but we’ve found using the whole egg will make the crust shiny from the egg whites and the yolk will give the crust it’s perfect color.
- Highly recommend serving these cherry hand pies with a bowl of vanilla ice cream!
- If you don’t want to use coarse sugar, you can always substitute for colorful sprinkles or festive colored sugar.
Storage and Reheating
Refrigerator: Best enjoyed fresh from the oven, these Cherry Hand Pies can be stored in an airtight container in the fridge for up to four days.
Freezer: If you’d like to freeze these cherry hand pies, lay them out on a baking sheet and place in the freezer until pies are just to the point of freezing. Then place them in freezer bags or airtight containers and freeze for up to 2 months. Thaw them in the refrigerator and serve at room temperature.
Reheating: If you’d like to warm your hand pie, simply pop in the microwave for a few seconds until warmed through. Careful the filling isn’t too hot!
More Festive Treats For The Holidays:
- Peppermint Cupcakes
- Cranberry Fluff
- Gingerbread Cake
- Peppermint Ice Cream
- Soft Sugar Cookies
- Chocolate Lasagna
Like This Recipe?
We’d love it if you would leave a 5 Star ⭐️⭐️⭐️⭐️⭐️ rating below.

Ingredients
- 42.3 ounces store bought pie crusts, 3 (14.1 ounce) boxes containing 2 pie crusts each
- 2 large eggs
- 2 tablespoons water
- 21 ounces cherry pie filling, 1 can
- Coarse sanding sugar, optional
💌 Don't forget to save this recipe!
Instructions
- Preheat the oven to 350℉, and thaw the ready-made pie crust, according to package directions. Line a large baking sheet with parchment paper. Set aside.42.3 ounces store bought pie crusts
- In a small bowl, whisk eggs and water together, and set aside.2 large eggs2 tablespoons water
- Use a rolling pin to roll out one thawed pie crust, ensuring there are no cracks or holes. The crust should be between ¼ and ⅛-inch thick.
- Using a holiday tree cookie cutter, cut out 7 trees, and save any excess crust.
- Place the cutout trees on the prepared baking sheet, and spoon about 1 – 1 ½ tablespoons of cherry pie filling into the center of each tree. Use a small pastry brush or your finger to brush the border around the filling with egg wash.21 ounces cherry pie filling
- Roll out a second pie crust and cut out 7 more trees, and save the excess crust. Gently place the second set of trees over the top of the filling. Starting at the trunk, lightly press the edges together, making sure not to press down on the filling.
- Using the tines of a fork, press the seams together, working around the outline of the tree. Using a sharp knife, make a few slits in the top crust for venting. Brush the top crusts with egg wash and sprinkle with coarse sanding sugar, if desired.
- Repeat the process with the remaining pie crusts. When all the ready-made pie crust has been used, and all that remains is the excess, combine it all and roll it out, the same thickness as the original crusts, to complete the remaining hand pies.
- Bake for 20-25 minutes or until golden brown.
- Transfer to a cooling rack. Serve warm or at room temperature.
- See post for storage options.
I love how easy these are to make! But nobody has to know you didn’t work all day to make them. So cute, too!!!
Thanks so much, Liz!